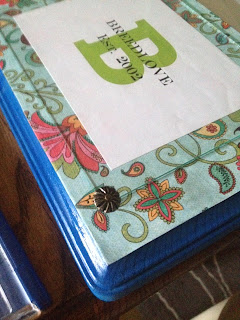
Welcome Spring! Spring has definitely sprung in my neck of the woods and I am loving it! We have had constantly warm weather and some beautiful sunshine. This project has been inspired by the spring. I have been wanting something to do on my door for some time now and I think that this is a perfect fit. So let’s begin…
You will need the following supplies:
1 wood block one size bigger than your glass frame
1 glass frame
2 eye hooks
Some chain
Mod-podge
Scrap book paper
Upholstery nails/decorative nails
I first started out with great picture frame and I really wanted to incorporate this into the project however; this was an epic fail.
So first you will start with the wood block. I purchased mine from Hobby Lobby. I liked the fact that it already had some design to it and since this was going on my front door, I really wanted it to stand out. The first thing I did was spray painted the wood. I made 2 of these, one for my front door and one as a wedding gift. The one for the wedding gift I spray painted white, since I didn’t know their colors. For mine, I spray painted it a vibrant color to make it stand out against my ugly front door (eventually I will be painting it!)
Once the spray paint dried, I then picked out some really pretty scrap book paper. Here is where you can get creative. I wanted something that reminded me of spring, hence this really pretty paper. When I see it, it really makes me smile. I then traced the wood around the back of the scrap book paper and cut it to size. I then mod-podged the wood and placed the paper on there. I also mod-podged the top of the scrap book paper to give it a glossy feel. I just realized that mod podge comes in many different finishes. I have the finish that is glossy but you can purchase matte etc.
Make sure you wait for the glue to dry before you do the next step. I did not and of course I ran into a few problems. You already know my hasty problem. So once the glue is fully dry (you could let it dry overnight, just to be sure) you will start placing the glass frame on top of the wood frame. Just a note, I got one of my glass frames from the Dollar Tree and the other one from Goodwill. I know that I didn’t spend over a dollar for each of these. I just used frames with nice glass and just removed the glass. I will probably use the frames for another project, which will be an added bonus. Once you have the glass positioned where you want it, you will start GENTLY hammering in the upholstery nails (if you did the last post that I posted, you should have a few of these left over. I love when things work out that way J) to hold the glass into place, plus give it an added decorative element. I did 3 sides at first and kept one side open until I placed the paper under the glass. Make sure that you keep at least 1 side open, you might want to keep 2 sides open so that the paper will slide in easily and you can move it around some to get the exact place that you want it.
Now here comes your creativity. The 2 that I made were front door name plaques however; you could place a saying here or maybe a no solicitation, the possibilities are endless. I love tapping into my creative side. When I was creating mine, I used Publisher and I automatically set the page size to the size of the glass frame so that I was making sure that I wasn’t going over the size etc. Once you have come up with what you wanted, you will then print it off. You can print on nice paper or you can be like me and print on regular paper. You might be able to print on scarp book paper; whatever works.
Once you print it off, then you just set it behind the glass. Make sure that you arraign it before you nail in the last few nails. If not you will not be able to move the paper around. Again, make sure that you are really gentle when you are tapping in the nails or else you will break the glass and that can get really messy J
So you are almost done, are you excited!! The next thing that I did was place some eyelit hooks in the top of the wood frame. I made sure that these were evenly placed at the top. I used 2 at either end of the wood frame. I then hooked some left over chain that I had from a previous project. If you don’t have any chain, then you can hit up the local craft store and purchase from chain in the jewelry department. I used a jump chain to hook the chain to the eye lit hook. Now, the final step, hanging it on your front door.
Also, do you love the "hello" that I painted on my front door. Now I have two things that make me smile when I come home. The "hello" thing is something that I saw on Pinterest and I just had to try. I knew I was re-painting my front door, so if this was a bomb, I could quickly cover it up. Needless to say, I love it and I still haven't painted my front door.
Please let me know if you have any questions. I also would love to see what fabulous ideas that you come up with!! Have fun and enjoy this wonderful spring weather.
Linking up with


No comments:
Post a Comment