Friday, May 17, 2013

Come Knock on my Door...


Welcome Spring!  Spring has definitely sprung in my neck of the woods and I am loving it!  We have had constantly warm weather and some beautiful sunshine.  This project has been inspired by the spring.  I have been wanting something to do on my door for some time now and I think that this is a perfect fit.  So let’s begin…

You will need the following supplies:

1 wood block one size bigger than your glass frame

1 glass frame

2 eye hooks

Some chain

Mod-podge

Scrap book paper

Upholstery nails/decorative nails


I first started out with great picture frame and I really wanted to incorporate this into the project however; this was an epic fail.

So first you will start with the wood block.  I purchased mine from Hobby Lobby.  I liked the fact that it already had some design to it and since this was going on my front door, I really wanted it to stand out.  The first thing I did was spray painted the wood.   I made 2 of these, one for my front door and one as a wedding gift.  The one for the wedding gift I spray painted white, since I didn’t know their colors.  For mine, I spray painted it a vibrant color to make it stand out against my ugly front door (eventually I will be painting it!)

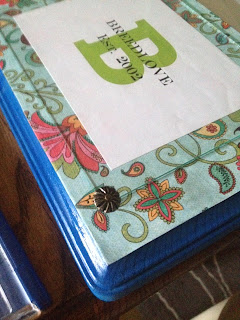
Once the spray paint dried, I then picked out some really pretty scrap book paper.  Here is where you can get creative.  I wanted something that reminded me of spring, hence this really pretty paper.  When I see it, it really makes me smile.  I then traced the wood around the back of the scrap book paper and cut it to size.  I then mod-podged the wood and placed the paper on there.  I also mod-podged the top of the scrap book paper to give it a glossy feel.  I just realized that mod podge comes in many different finishes.   I have the finish that is glossy but you can purchase matte etc.

Make sure you wait for the glue to dry before you do the next step.  I did not and of course I ran into a few problems.  You already know my hasty problem.  So once the glue is fully dry (you could let it dry overnight, just to be sure) you will start placing the glass frame on top of the wood frame.  Just a note, I got one of my glass frames from the Dollar Tree and the other one from Goodwill.  I know that I didn’t spend over a dollar for each of these.  I just used frames with nice glass and just removed the glass.  I will probably use the frames for another project, which will be an added bonus.  Once you have the glass positioned where you want it, you will start GENTLY hammering in the upholstery nails (if you did the last post that I posted, you should have a few of these left over.  I love when things work out that way J) to hold the glass into place, plus give it an added decorative element.  I did 3 sides at first and kept one side open until I placed the paper under the glass.  Make sure that you keep at least 1 side open, you might want to keep 2 sides open so that the paper will slide in easily and you can move it around some to get the exact place that you want it. 

Now here comes your creativity.  The 2 that I made were front door name plaques however; you could place a saying here or maybe a no solicitation, the possibilities are endless.  I love tapping into my creative side.  When I was creating mine, I used Publisher and I automatically set the page size to the size of the glass frame so that I was making sure that I wasn’t going over the size etc.  Once you have come up with what you wanted, you will then print it off.  You can print on nice paper or you can be like me and print on regular paper.  You might be able to print on scarp book paper; whatever works. 

Once you print it off, then you just set it behind the glass.  Make sure that you arraign it before you nail in the last few nails.  If not you will not be able to move the paper around.  Again, make sure that you are really gentle when you are tapping in the nails or else you will break the glass and that can get really messy J

So you are almost done, are you excited!!  The next thing that I did was place some eyelit hooks in the top of the wood frame.  I made sure that these were evenly placed at the top.  I used 2 at either end of the wood frame.  I then hooked some left over chain that I had from a previous project.  If you don’t have any chain, then you can hit up the local craft store and purchase from chain in the jewelry department.  I used a jump chain to hook the chain to the eye lit hook.  Now, the final step, hanging it on your front door.

So what do you think…

 
While I was posting this, I was thinking that it would be cool to use glass paint and make some really cool design or you could use a dry erase marker so that you could be able to constantly change the information. 

Also, do you love the "hello" that I painted on my front door.  Now I have two things that make me smile when I come home.  The "hello" thing is something that I saw on Pinterest and I just had to try.  I knew I was re-painting my front door, so if this was a bomb, I could quickly cover it up.  Needless to say, I love it and I still haven't painted my front door.

Please let me know if you have any questions.  I also would love to see what fabulous ideas that you come up with!!  Have fun and enjoy this wonderful spring weather.

Linking up with


Friday, May 10, 2013

Campaigning...I vote yes!!

So recently I have been seeing dressers and other pieces of furniture that have these cool brass fitting on the edges and around the drawers.  I completely feel in love with these pieces.  I guess they have been popping up on the internet and the blogisphere for some time now, I just never noticed.  These pieces are called “Campaign” furniture.  So the other day I was thinking, there must be a way to do these, so I found this fabulous blog with the step by step process of campaigning your furniture.  So here is my step by step process.

I started out with these hideous night stands from our bedroom.  Every time I hear or type the work hideous I think of that State Farm commercial…”she sounds hideous”.  Well these were quite hideous.  I tried painting them a year or so ago some antiqued white but they still didn’t look so hot. 


The night stand even looks sad.  Look at the frown.

This time around I did some research on chalk paint.  I made my own chalk paint and painted the furniture with it.  More details to come on the chalk paint.  I really liked using the paint and it covers the furniture soooo well.  I also eliminates the need for sanding, priming and several coats of painting, which let’s face it, if I can skip out on a few steps of doing something, I will.  If you haven’t noticed yet, I’m a person that loves to come up with a project and then have instant results….i don’t like waiting!
So I painted the furniture and then I did a neat little trim work around the drawers.  I thought that was needed to give it a little pop of color so that it just didn’t get hidden in the room.  I actually painted the entire night stand this lovely gray color and then I used a paint pen (this totally did not work, I actually used regular paint) to trim out the white.  I think that worked best.  I don’t have the steadiest of hands to trim out the white with a paint brush...well now I have the steadiest hand...not really.


I went to the hardware store and picked up 2 sets of corner braces and 1 set of regular braces.  I actually found that Home Depot had everything that I needed, always makes shopping easy.  You can go to any hardware store and they should have this stuff.  I was hemming and hawing over steel or brass.  Most of the pieces that I have seen used brass however; I did like the steel look too.  So I finally decided on brass because it gives more of an antiquie feel plus I think that it stands out more than a steel color against the gray color.  One word to the wise, measure where you want to place the braces and make sure that you are getting the right size.  They offer many different sizes and you want to make sure that you are picking up the right fit.  Lesson learned.

For the corner braces and the regular braces, they come with screws for you to secure them into the furniture.  You can use the screws however; I wanted a something a little bit different.  I decided to pick up a package of upholstery nails.  They are decorative and they are so easy to work with. 


The next steps are really easy.  I just decided on where I wanted to place the braces and then I made sure that I measured and lined them up accordingly.  Once I had the right spot, I just carefully nailed in the upholstery nails.  If you have some muscles, you might be able to push the nails right into the furniture. 


So this is how they came out!!  What do you think??  I am so in love with these night stands now.  I can honestly say that they don’t look hideous anymore…they are a thing of beauty.

Just a few more pictures because I'm in love...


You can see that I spray painted the handle and the knobs.  It was a goldish color.  I might change out the knobs and get some cools ones from Hobby Lobby.  They usually have their knobs and handles 50% off.  I went there on Tuesday and I saw a few that I really liked.  So we will see.


One quick idea, if you don’t like the brass look or the steel look, you could purchase this product called Rub and Buff.  It comes in different metal finishes and you just do what the description says…rub and buff this product on.  Also, if you are looks for something that has a pop of color, you could end up spraying painting the braces first and then nailing/screwing them into the furniture.        

Now look at my little helper.  Isn’t he soooo cute….

So I have the following coming up.  This weekend we are going to start updating our kitchen.  We will be installing a dishwasher, garbage disposal, new sink and countertops.  I will keep you posted with our progress, but wish us luck :)  Also, I will be doing a post on the paint that I used.  So there is a lot more to come.  Thanks for viewing my blog and it at any time you have questions/comments, please leave them for me.  If you are interested in sometime in particular, let me know.  I love to hear your feedback. 

Thanks for viewing,

Kim

I'm linking up with...


Friday, May 3, 2013

I Did It! I Did It! My Very Own Sofa Table!


Hello Everyone, I hope that your week is going fabulous.  I have had a fantastic week. Work has been really awesome and things are starting to fall in place.  I love that feeling.
So last week after seeing a few pinterest ideas, I decided that I would try my best to create a sofa table for my living room.  Now, I bet your saying…"Kim, there is no way possible for me to create a sofa table or for that matter any table, I don’t have the skills nor the tools to do that.”  I felt the same way for the longest time.  I thought, I could never do something that involved that acquired that much skill and ability.  I was actually wrong. So this blog is really about using the items that you have and really taking a chance to see what you can create :)  I only used the items that I already had in my garage and I didn’t use any big expensive tools.  So I will show you what I did to make this awesome/functional sofa table…
 
So last week I was walking to my kitchen and spotted these legs in my garage, it was one of the corner of the eye moments.  If you have ever had one you will know what I mean.  Anyways, I was like, hmmm, I think I could make a sofa table out of these.  Now, these legs actually came off of an over the toilet cabinet that we never used.  I actually used the cabinet as craft storage and I didn’t need the legs.  These totally came in handy. Now if you don’t have legs, then my suggestion would be to just use some 2x4 for the legs.  So, this project all started with the legs.
  

Look at that dark dingy basement :(

 
Here we go…
What you will need:
                3 – 1x8 pine boards cut into 4 ft
                4 -  "L" brackets/corner braces
                4 – Mending Plates
                Stain and/or paint of your choice
1.       I found some 1x8 in the garage. These were already cut down to 4 feet.  I was going to use them for board and batten look in my bathroom but I went with something different. Anyways, you will only need 3 boards cut into 4 feet.  You can have your big box stores cut them for you.  That makes life so easy ;)
2.       Then I lined up my boards, I used 3 boards.  I didn’t want to make it super wide because I was only working with a same space.  You could use more or less depending on how wide your legs are.  I used these wonderful things called ____________ to secure the boards. I know that probably carpenters are not using these but hey they work and they are super easy.  Make sure that you secure them to the back side of the wood.  I only had to use 4.
 
3.       Once you have the boards lined up and you have secured them together, now you want to secure them to the legs.  I used these lovely things called “L” brackets or corner braces.  These too are great to have in your arsenal.  I have used them for so many things. Now, turn your piece over and secure them to the boards and to the legs. Make sure that everything is lined up the way that you want it before you start screwing in the “L” brackets.
   
4.       Once these are secure you are almost done.  Yeah!!  At this point I realized that the frame work for the sofa table wasn’t really that sturdy.  I was going to be placing some lamps and pictures and other things on there and I really didn’t want them to wobble.  Also, I don’t have this right behind my sofa (so I’m not too sure why I’m calling it this but anyways) and I didn’t want anything to come crashing down.  If everything seems secure enough for you, then you don’t need to do these next steps okay. 
You will need to create a brace towards the bottom of the table to keep everything really secure.  I took 2 pieces of the same wood.  I decided to place them on top of the support for the legs.  Wait…that was my intention, but you will see later that I really messed that part up.  Anyways, I needed to notch out a section of the wood in order to do this.  I used a jig saw but if you don’t have a jig saw – no worries, you can use a regular old saw :)  Also, I only had to do this with the legs that I was using.  You might not have to do this if you are using regular 2x4 or some other type legs.  Once I had them fitted to the way I liked then I screwed them right into the leg supports.  You can see in the pictures where I messed up.
 
5.       Once the table is constructed to the way you like it, now here is the fun part.  You can paint it or stain it.  I bought this small tube of gel stain from Hobby Lobby and I used a rag and stained the top part. You don’t need to the underside because no one is going to see it.  I then used some black acrylic paint for the legs. These were already painted white and I wanted to see how the black would look if I used a rag to wipe it on.  It kinda of looks like they are metal now.  I really, really love the way they look now. 


6.       Now the even funner (fyi, I know that is not a word) part, now you can decorate it and place some of you really cool finds and a lamp or too on it.
 
7.       Lastly, you can sit on your couch with a half ice tea/lemonade combo and marvel at the great work that you did and think…wow I did this, what more can I do…


**do you love the mail letter holder, I got this for $2 at Goodwill, I can't believe someone donated that beauty :)  Also, check out the big die that I made, <3 that too!!
I hope you enjoyed this post.  I wanted to really show you that I can build something with the materials you might already have.  I also wanted to demonstrate that you have the skills to build these things.  I always thought that my skills were nowhere near ever creating something like this but you all have the skills and abilities.  I hope that this has encouraged you to see what you can create.  I would love to make a dining room table or maybe an outdoor table.  We will see… Please share any ideas or if you create something similar, I would love to see what you create :)

I'm Linking Up with....